从零开始的 Git 生活 - Git 简易食用指北
亲爱的摸鱼弟弟亲自制作了一份极为精美的 Git 教程,有感而发而作此文
诱导 -> 摸鱼的Git教程——10分钟快速上手
1. 概要
Git, 一个分布式版本控制系统, 由大名鼎鼎的 Linux 之父 Linus Torvalds 开发, 世界上最好用最牛逼的 VCS ( 没有之一 )
git(/ɡɪt/) 1 在英文中的释义是 "傻子"
在 Git 自身的 README 中, Linus 曾对 Git 的名字做出了调侃 2 3
"git" can mean anything, depending on your mood.
- random three-letter combination that is pronounceable, and not actually used by any common UNIX command. The fact that it is a mispronounciation of "get" may or may not be relevant.
- stupid. contemptible and despicable. simple. Take your pick from the dictionary of slang.
- "global information tracker": you're in a good mood, and it actually works for you. Angels sing, and a light suddenly fills the room.
- "goddamn idiotic truckload of sh*t": when it breaks
接下来是几点我的个人建议
- 不要使用 Git GUI 以及任何类似功能的软件,而是使用 Git 命令行
- 不要使用 VSCode 的三路合并器,而是进行手动合并
- 提交 commit 时请尽量使用清晰易懂的话描述你的提交内容,类似于↓
#错误示例:
git commit -s -m "Make Page +1"
#正确示例:
git commit -s -m "This page is finished. Switch to next page"
2. 直奔主题
2.1 开始之前 | Git 的四区与四态
Git 有四个工作工作区域,分别是
- 工作区 (Workspace)
- 暂存区 (Index/Stage)
- 仓库区 (Repository)
- 远端区 (Remote)
这些工作区域通过不同的 Git 命令联系在一起,如图所示
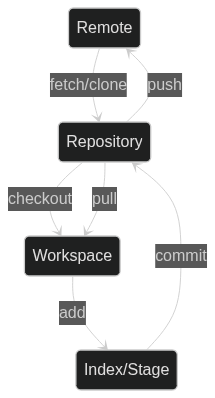
这张图也揭示了一般的 Git 工作流
- 在工作区 ( Workspace ) 中修改内容
- 使用
git add将修改加入暂存区 ( Index/Stage ) - 使用
git commit将暂存区 ( Index/Stage )中的修改提交到仓库 ( Repository ) 中 - 使用
git fetch捕获远程仓库 ( Remote ) 的新提交 - 使用
git merge将远程仓库的提交合并到自己的仓库中 ( 并解决可能的合并冲突 ) - 使用
git push将你的修改提交到远程仓库 ( Remote ) 中
上面的工作流中可能有相当一部分你不熟悉,没有关系,下面的文章都会给出详解,等到学完 Git 的基本操作,再回来看这个工作流就会非常简单了
而作为一个版本控制系统,最本分的工作就是追踪不同版本之间文件的变化,与一些 VCS 不同的是,Git 并不关心这个文件具体的变化是什么,它只关心这个文件有没有变化,Git 使用 SHA-1 散列算法来确认文件是否被改变,Git 会对它追踪的每一个文件都计算一个 SHA-1 散列值,如果文件计算出的散列值与先前存储的散列值不同,那也就意味着该文件被改变了,就为这个文件直接生成一个新的快照而不去保存它具体的更改,这种方法是以空间换时间,在如今存储设备愈发廉价的时代,牺牲一些空间来换取极佳的体验是完全值得的
Git 中的文件也有四个状态,分别是
- 未被追踪的 ( Untracked ) : 文件刚刚被添加到该工作区,还未被 Git 收录入版本控制,在对该文件使用
git add <file>命令后,文件状态转为 Staged - 未被修改的 ( Unmodified ) : 文件已被 Git 版本控制追踪,且文件相较于当前版本 ( HEAD ) 未被改变,修改 Unmodified 的文件后,该文件状态转为 Untracked
- 已被修改的 ( Modified ) : 文件已被 Git 版本控制追踪,且文件相较于当前版本 ( HEAD ) 已被更改,但新的变更并未被 Git 追踪,使用
git add <file>后,处于该状态的文件转为 Staged ,使用git checkout HEAD <file>后,该文件状态转为 Unmodified 并被还原至当前版本 ( HEAD ) 中的状态 - 已被暂存的 ( Staged ) : 文件已被 Git 版本控制追踪,且文件相较于当前版本 ( HEAD ) 已被更改,且新的变更已被 Git 追踪,但变更尚未同步到本地仓库 ( Repository ) 中,在使用
git commit后,所有处于 Staged 状态的文件转为 Unmodified 且进入一个新版本,使用git checkout HEAD <file>后,该文件状态转为 Modified 且内容被还原至当前版本 ( HEAD )
看上去繁杂的 Git 指令操作,归根结底其实也就是在四区中将文件在四态之间转换来转换去,理解了这一点后,后面的学习就会变得非常简单,不只是要理解每个 Git 命令的作用,更要看到它背后的含义,下面我们就来进入正式的指令学习
2.2 Hello World | git init
git init 指令用于在本地初始化一个仓库,来运行一下试试看吧~
[credits@CreditsLaptop git-tutorial]$ git init
hint: Using 'master' as the name for the initial branch. This default branch name
hint: is subject to change. To configure the initial branch name to use in all
hint: of your new repositories, which will suppress this warning, call:
hint:
hint:   git config --global init.defaultBranch <name>
hint:
hint: Names commonly chosen instead of 'master' are 'main', 'trunk' and
hint: 'development'. The just-created branch can be renamed via this command:
hint:
hint:   git branch -m <name>
Initialized empty Git repository in /home/credits/git-tutorial/.git/
[credits@CreditsLaptop git-tutorial]$
这样我们就成功的在本地创建了一个 Git 仓库,默认分支为 master
可以注意到,git init 指令是允许传入参数的,我们可以在创建仓库时就指定主分支的名字,有两种方法,首先是在使用这条命令时直接传入,格式为
git init -b <branch name>
另一种方式则是借助 git config 命令 ( 之后会细致的解释这个命令 ) 设定创建分支时默认使用的名字
git config --global init.defaultBranch <branch name>
2.3 来,让 Git 康康 | git add
git add 是一个用来将当前未被 Git 追踪的文件添加到 Git 的暂存区,下面就来试试
首先创建一个新的文件
[credits@CreditsLaptop git-tutorial]$ touch example1
然后使用 git add 来让 git 追踪它,进入暂存区
[credits@CreditsLaptop git-tutorial]$ git add example1
现在我们成功追踪了这个文件,来用 git status 看一下当前工作区和暂存区的状态
[credits@CreditsLaptop git-tutorial]$ git status
On branch main

No commits yet

Changes to be committed:
  (use "git rm --cached <file>..." to unstage)
        new file:   example1
是不是非常简单呢,那么如果我们有多个文件,想要一起添加到 git 中,怎么办呢
当然是有多少来多少啦 ( 也可以使用正则表达式哦 )
[credits@CreditsLaptop git-tutorial]$ touch example2 example3
来看看现在的状态
[credits@CreditsLaptop git-tutorial]$ git status
On branch main

No commits yet

Changes to be committed:
  (use "git rm --cached <file>..." to unstage)
        new file:   example1

Untracked files:
  (use "git add <file>..." to include in what will be committed)
        example2
        example3

[credits@CreditsLaptop git-tutorial]$
出现了两个未被追踪的文件,现在我们来追踪它们
[credits@CreditsLaptop git-tutorial]$ git add example2 example3
[credits@CreditsLaptop git-tutorial]$ git status
On branch main

No commits yet

Changes to be committed:
  (use "git rm --cached <file>..." to unstage)
        new file:   example1
        new file:   example2
        new file:   example3

[credits@CreditsLaptop git-tutorial]$
成功追踪
那如果我们想要一股脑把现有目录中的所有文件都添加到 git 中呢,当然是直接在 add 后面加上啦,现在我们就可以来看一下它最常见也是最常用的命令模板
git add <files/directories>
这样,关于 git add 命令,掌握这些就足够用了
2.4 那就给你康康 | git commit
git commit 命令用于将暂存区的文件提交到本地仓库中,在上一节的内容中,我们已经向暂存区中加入了几个文件,现在就来做出我们的第一次提交吧
[credits@CreditsLaptop git-tutorial]$ git commit
Author identity unknown

*** Please tell me who you are.

Run

  git config --global user.email "you@example.com"
  git config --global user.name "Your Name"

to set your account's default identity.
Omit --global to set the identity only in this repository.

fatal: empty ident name (for <credits@CreditsLaptop.>) not allowed
[credits@CreditsLaptop git-tutorial]$
喔,原来 git 还不知道我们叫什么名字呢,那不妨让我们先给 git 做个自我介绍,就要用到 git config 这个命令,在下文中,它还会再被详细描述,我们仅仅在这里使用
[credits@CreditsLaptop git-tutorial]$ git config --global user.name 'EndCredits'
[credits@CreditsLaptop git-tutorial]$ git config --global user.email 'alicization.han@gmail.com'
[credits@CreditsLaptop git-tutorial]$ git config --global core.editor 'vim'
上面的命令中,我们告诉了 Git ,我们的用户名是 EndCredits,邮箱是 alicization.han@gmail.com,编辑提交信息时使用的编辑器是 vim,当然这里不一定非得用 vim ,只是个人习惯了,也可以用 neovim 或者 nano 之类的,用着顺手就可以
现在终于可以做出第一次提交啦
[credits@CreditsLaptop git-tutorial]$ git commit
然后就会跳出编辑器的界面

现在我们来编辑这个文件,文件的第一行是你的提交 (commit) 的 title ,简述你这条 commit 的作用/意图,这是必须的,然后隔一行就可以写这条 commit 的详情,包括为什么要做出这条提交,有什么注意事项,测试结果等等,这个可以不写,至于为什么要隔一行才能开始写详情,这样可以避免一些 Git 系统把你的第二行也一起识别成 title ,十分影响可读性,那么下面我们就来填充这个 commit 的信息

保存并退出,就可以看到我们的提交已经完成了
[credits@CreditsLaptop git-tutorial]$ git commit
[main (root-commit) d231161] Initial commit for the git tutorial
 3 files changed, 0 insertions(+), 0 deletions(-)
 create mode 100644 example1
 create mode 100644 example2
 create mode 100644 example3
[credits@CreditsLaptop git-tutorial]$
与 git add 一样,git commit 也是接收参数的,我们最常用到的参数有以下这么几个
-a : 自动将所有处于已被修改的 ( Modified )状态的文件或被删除的文件添加至暂存区,并随当前暂存区中的内容一同提交
-s : 在提交中自动加入 Signed-off-by: 的字样,如下图所示

--amend: 后悔药,如果不小心打错了什么东西但是又手贱做了提交,那么加上这个参数我们就可以修改刚刚 commit 的内容,注意,这个参数只能修改 HEAD 的 commit message ,如果想要修改更早的 commits ,我们需要配合 git rebase 一起使用,之后会说到这里
--author: 可以指定这条 commit 以谁的身份来做,格式是
git commit --author='user.name <user.email>'
比如以我的身份,那就是
git commit --author='EndCredits <alicization.han@gmail.com>'
通常情况下我们不需要这个,git 会自动帮我们打上我们自己的信息,可是当 commit 的变更不是我们自己写的或者是应用 patch 的时候,我们就需要它来保留作者的名字和邮箱
掌握了上述内容,git commit 就基本够用了
2.5: 不给你康 | git rm
未完待续...